GC5 Kit Information & Instructions
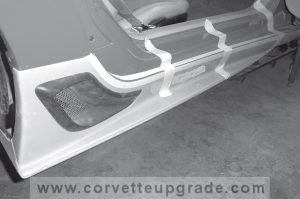
SIDE SKIRTS:
Remove rear wheels and wheel wells.
(this step is optional and not necessary
Remove (3) torx screws (#15) behind the doorjambs
that hold rear quarters to doorjamb. Install
one nylon washer between rear quarter and doorjamb on
bottom screw. This will help with the alignment of rocker.
Remove (unbolt) factory plastic.
Hold rocker in position and use 2” tape to hold
in place.
(Note: rub the tape across your shirt or pants to take out
some of the stickiness. This is to keep the tape
from sticking too strong on the paint, to keep it
from doing possible damage to the clear coat.)
Mark the bottom screw holes on the rocker and remove rocker.
Drill the bottom screw holes with drill bit
and install clips or bolts on underside of vehicle.
Reinstall rocker and tighten fasteners. Adjust
until satisfied with fitment.
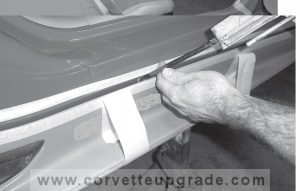
Put tape on rocker and doorjamb, up to
the edge of the seam where the epoxy will
bond the rocker and doorjamb together.
Loosen or remove rocker fasteners, until
there is a gap for the epoxy nozzle to go
into.
Put epoxy into seam.
Re-tighten fasteners and wipe the seam down low
with paper towels or Q-Tips with an automotive
wax and grease remover on it. Use tape to
tighten the fit of the rocker to doorjamb gap as
needed, leave tape on until epoxy fully cures.
(Note: if epoxy begins to harden before you
finish cleaning, you can finish by using
acetone carefully and sparingly.)
Reinstall rear wheel wells if uninstalled.
If the skirts seem like they have too tight of a fit, just sand down on the inside ends and thin out the fiberglass if needed. Every now and then, a customer will notice the skirts are a very tight fit. Don’t be afraid to sand on these parts to thin them out. They can be very thin without risk of damaging the part. Also, remember that once the part is on the car, the fiberglass will conform to what it is being bolted on. You will gain a lot of clearance just by sanding and properly bolting the skirts on.
REAR WRAP:
This is the easiest piece to install. You can either counter sink the hardware, then Dura-glass over them so you cannot see the hardware, or you can epoxy the piece onto the car. If you use fiberglass welding epoxy, the part will stick on there so good – it will never fall off if done correctly.
You only have to hold the part up to the car, make your alignment marks, and that is it. Attach to car however desired.
REAR WING:
The other simple install. We have already drilled and tapped the wing for you. There are 1/4 inch steel plates in the wing pedestals, so you don’t have to worry about brackets, or the wing falling off. It will not fall off! Hold the wing onto the car where you feel it sets best. Make your marks. We recommend taking out your license plate and two inner tail lights to give you room to reach up and bolt the wing into place. You DO NOT want to uninstall the rear bumper. Many shops will tell you have to do this, but you don’t. Once you uninstall the urethane bumpers on these cars, it will never look the same as it does now. None of our customers have ever had to take off the rear bumper for this install.
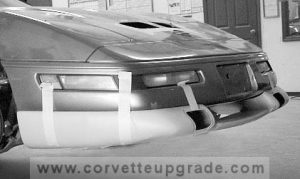
FRONT SPOILER:
We recommend taking off your plastic air dam in order to have the most room to maneuver the new front spoiler.
Trial fit Spoiler
a. Use 2″ masking tape to hold spoiler sections in
place.
b. Find the best location for the 3 pieces.
Mark & drill holes.
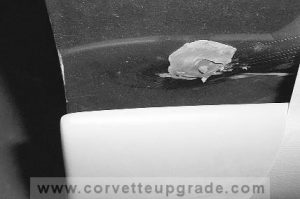
a. Make a small pancake of clay and place on stock (you can also just use a sharpie pen)
bumper in the area of all 3 clip or bolt locations on one side
of the front spoiler.
b. Adjust the clay until you get a good impression of all
3 holes at once.
NOTE: making the clay pancakes as thin as possible
will yield the most accurate hole locations.
c. Drill holes through the marks in the clay,
making sure that the drill bit doesn’t “walk” across the bumper.
______________
a. The two side positions on the spoiler are attached
with screws from the inside of the bumper.
b. The front position on the spoiler is attached with a
screw, from the inside of the spoiler. This is why
it is unnecessary to install a clip in the stock bumper.
Hold a clip up to the front hole in the stock
bumper with the clip facing forward.
d. Mark the back of the hole where the clip will be
installed.
e. Measure back 1/2″ and use appx 1/4 inch drill bit to make
a hole in which the clip will be placed.
NOTE: You want the clip to be installed from the back
of the screw hole. DO NOT make the hole
toward the front of the car. Make it towards the back of
the car.
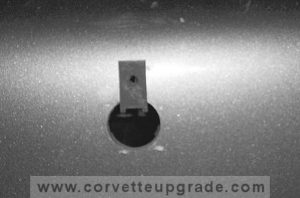
PLEASE NOTE: Only make a hole large enough for your clip to fit into – the way it was done in this picture, the hole
is too large for what we like to see.
Trial fit Spoiler pieces.
a. Mount one side of the Front Spoiler, and snug the screws.
b. Fit the other side Front Spoiler with tape, with the center section in place.
c. Find the best fit of the pieces in unison, then tighten the screws on the one side.
d. Repeat the procedure for the other side of the Front Spoiler.
The center bar can be installed by putting bolts or screws on to the sides of the pods. You won’t be able to see any of this hardware once installed.
If you look at the pods, you will see sections that flange out which look like tabs…that is where the hardware gets installed, and you will not be able to see any hardware at all once the kit is installed. There are at least 3 tabs in each pod. (there are also flanges on the lower rear bumper wrap) You do not install the pods by drilling from the outside. One thing as well, the urethane will conform to all of these parts, so fitment will look very nice.
Prep Work
Please do not use any chemicals on the parts. Some people try to wash off the black gelkote rather than sanding it. That will result in wavy, warped parts. Rough them up with 80 grit sand paper while doing necessary body work. Be sure to have Dura-Glass or other types of bondo with fiberglass in it. Also fiberglass pinhole filler may not be a bad idea. It will be a good investment. Then smooth it out with 300 grit paper, or similar grit, use a high seal primer and you are good to go. We recommend to do a dry fit of the parts first, then install them before painting. Make your adjustments to the parts according to your Corvette, then take them off for paint. One other thing, in the bumpers you will see where there are indentations where the bolts would go. You do not need to feel like you have to bolt along those guidelines. You may use the bolts anywhere it fits best for you.